Wet n Wild MegaGlo Contouring Palette – DBW Product Review

img_6901
There was a time, not so long ago, when I shied away from setting powders because I believed powder of any kind emphasized my fine lines and wrinkles. Over the last 6-12 months I’ve had the opportunity to test some powders and application techniques. And I’ve discovered that finely milled, well-formulated powders applied and set properly can actually help to diminish the look of fine lines and age-related texture on my skin. These 2-shade powder palettes from Wet n Wild have become one of my favorites.

Price: $4.99 / for 0.44 oz. (12.5 grams) palette

Where to Buy: Wet n Wild is so at Walmart stores nationwide along with select CVS, Walgreens and other major discount retailers and drugstore chains.

Color Range: 2 shades are offered, both named after desserts – the lighter combo is “Dulce de Leche” and the darker is “Caramel Toffee.” The lighter combo provides a matte ivory highlight powder and a cool-toned contour shade. The deeper combo features a vanilla-toned highlight shade that’s also matte and akin to a pressed version of Ben Nye’s Banana Powder (made famous by Kim Kardashian and her MUA). The darker combo also includes a deeper shade intended for contouring that is a more neutral in tone, containing a nice balance of cool and warm tones. Experts tell us cool tones (with more blue/gray undertones) are more appropriate for contouring because they most closely mimic actual shadows.
img_6900
Application, Texture and Finish: These powders, especially the lighter shade, can easily be applied with a puff, makeup sponge or brush of any size. These palettes do kick up a good bit of powder when you dip your brush into them, so plan for some fall-out. I find that the lighter shades very similar to a loose powder. It’s very finely milled and incredibly soft, but it’s a talc base so the texture differs from MAKE UP FOR EVER’s HD Finishing Powder (that one’s 100% silica). I find that any excess powder is easily removed with a brush or damp beautyblender® type sponge. And any overly powdered look is easily remedied with a good setting spray.

Coverage: Because the lighter shades are intended as highlight, they don’t provide a lot of coverage. They’re somewhat sheer. However, they do offer sufficient coverage and brightening to perform the intended effect.

I’m not that big into full-on contouring because I’ve never figured out how to pull off that look without looking muddy. I do enjoy using the darker shade for a little light bronzing around the perimeter of my face. And it works incredibly well as a transitional eye shadow shade because it blends like a dream!

Wear: Applied and set these powders don’t budge. My favorite way application is using the lighter shade to set under-eye concealer. It works extremely well for baking – decreasing any creasing you may experience with your favorite concealer and improving the longevity and wear time. I find that I may need the occasional powder up after 5-6 hours of wear, usually only in my oiliest areas or if I’m wearing particularly oily moisturizer underneath these powders that day. On a positive note, I have never experienced any oxidizing or color-changing with these powders even when applied over heavy-duty moisturizers or when set with my DIY Glowy Setting Spray (which includes a bit of oil from the added antioxidants). That’s good news for oily-skinned gals who’ve experienced the dreaded oxidation “orange face” that happens mid-day with some powders.

Packaging: This is where you’ll recognize this as an inexpensive product. These palettes are enclosed in cheap plastic with a basic opaque black base and a thin, clear plastic lid that scratches easily. The palettes have a basic snap-type closure that can break after a while or when dropped. The packaging is obviously not great, and if you plan to carry one of these in your makeup or travel bag, be mindful that the packaging means they’re more fragile. All things considered, I’d rather save money and get a great makeup bargain than spend an $15-20 extra for fancy packaging. But if you prefer beautiful packaging, Wet n Wild is probably not a brand that speaks to you anyway.

Skin Beneficial Ingredients: Minimal. This is not a skin care product so don’t expect it to provide a bunch of antioxidants or skin-beneficial ingredients. These powders are composed primarily of talc, nylon, boron nitride and aluminum starch. Then again these palettes cost less than $5 and for the money you get a ton of product.

Full Ingredient List (per company website): Talc, Nylon-12, Boron Nitride, Aluminum Starch Octenylsuccinate, Ethyl Macadamiate, Dimethicone, Magnesium Myristate, Synthetic Fluorphlogopite, Phenoxyethanol, Trimethylsiloxysilicate, Lauroyl Lysine, Caprylyl Glycol, Polybutene, Hexylene Glycol, Ethylhexylglycerin, Tocopherol, o-Cymen-5-ol, Methicone (in shade 749A), [+/- (MAY CONTAIN/PEUT CONTENIR): Mica, Iron Oxides/CI 77491, CI 77492, CI 77499, Titanium Dioxide/CI 77891, Red 40 Lake/CI 16035, Yellow 5 Lake/CI 19140, Ultramarines/CI 77007].

Summary and Daily Beauty Wisdom Rating: These palettes are terrific beauty bargains for anyone looking to experiment with contour and highlighting. And they’re great on-the-go options for anyone who, like me, rushes out the door with their makeup half done (intending to finish in the car or upon arrival at their destination) or anyone needing a fantastic touch-up powder combo. I should add that this is currently my second favorite setting powder, second only to the far more expensive Laura Mercier Translucent Loose Setting Powder ($38 / 1 ounce) which is also talc-based and considered among the best setting powders in the industry. Yes, it’s that good! Give these palettes strong consideration. They’re worth the $5.

One final comment, Wet n Wild claims on the front side packaging for these products that they are cruelty free. However, the back side packaging clearly states they are made in China, which some would say negates the “cruelty-free” claims. If that’s an issue for you, be advised.

Additional Reviews:
Makeup Alley ratings https://www.makeupalley.com/product/showreview.asp/ItemId=177909/Coloricon-Contouring-Palette/Wet–n–Wild/Contour (4.3 / 5 lipsticks; 83% of Reviewers said they would repurchase).
Stacy Makeup’s Review (spoiler – she recommends these palettes as an all-around beauty bargain).
* It’s interesting to note that many of the more well-known makeup review sites don’t yet have reviews for these palettes. So they’re kind of under-the-radar beauty products that seem to garner positive ratings among those who have tried them.
img_6809
For more information, check out the full product info and Wet n Wild company page here.

Wisdom for the Day:
“Now we see a reflection in a mirror; then we will see face-to-face. Now I know partially, but then I will know completely in the same way that I have been completely known.” I Corinthians 13:12 (Common English Bible)
Read more here.

Making Milani’s Conceal+Perfect Foundation Work for All Skin Types

Milani Conceal+Perfect 2-in-1 Foundation+Concealer

Milani Conceal+Perfect 2-in-1 Foundation+Concealer

Recently, I wrote how my excitement to try Milani’s Conceal+Perfect 2-in-1 Foundation+Concealer quickly turned to disappointment when it didn’t look very pretty on me. After all the buzz around this foundation, I really wanted to make it work for me so I kept playing around with it and discovered some tricks that ensure I achieve a beautiful result every time I reach for this.

I have come to the conclusion that this really is a great foundation that’s worth the hype. But this is not as easy foundation. It’s not one to reach for on lazy (AKA no-makeup look) days. It’s the one to grab when you’re short on time. This process I outline below involves several steps (5 to be exact; though you could conceivably combine Steps #1-2 if you have a favorite water-based daytime moisturizer that gives you broad-spectrum SPF of 30 or more. I’ve just never found one). This may require more time than you may have most mornings. So you may want to save this for special occasions or days when you have extra time because the result is beautiful and worth the effort.

Some basic concepts to help you achieve the best results:
• First and foremost you need to understand the chemical composition of this foundation. It’s oil-free and made up primarily of water and silicones (if you’re interested I’ve included the full ingredient list at the bottom of this post and highlighted all the silicones for reference). So you want to diminish the amount of oil on the surface of your skin and avoid using any products that contains oils to ensure prettiest application and longest wear-time of the foundation. Hint – this is NOT the time to use Wayne Goss’ famous add a drop of oil to your foundation trick. Instead, you want to follow a couple of other Wayne Goss tips, blotting your face of excess oil throughout the application process and carefully avoiding any products that counteract the ingredients in this foundation.
• With each step/trick, I try to give several options for the products I suggest. You almost certainly can get this done with products you have on hand once you get the idea of the types of products that work. Then check out your stash for similar options you could try.
• I’ve done a complete review of the foundation below for anyone who may be curious about this foundation. You can read that review posted separately here.
• Each of the following steps are based on prepping the skin to be in the best condition to receive this foundation, so the makeup applies its best and has every chance to last 10 hours (or longer). In order to make this foundation work, you need to use products that have similar ingredients to Conceal+Perfect….again, reference the ingredient list – avoid oils and stick to water or silicone-based products. When I first tried to use this foundation, my biggest problem (when I had bad results) was trying to apply it over several oil-based moisturizing products which were basically counterproductive.

Application Steps and My Tips:
img_6431
Step #1 – Prep your skin with a good silicone-based oil-free antioxidant serum followed by a water-based moisturizer. The type of serum and moisturizer you use are important. This is NOT the time to use your trusty Clinique Dramatically Different Moisturizing+ Lotion (it’s a sesame oil base) or to use Argan Oil (yes, it is good for you, but it won’t work here). My favorite antioxidant serums are from Paula’s Choice, and Paula’s Choice Resist Ultra-Light Super Antioxidant Concentrate Serum is absolutely brilliant under tricky foundations like this one. It provides an extraordinary cocktail of anti-aging skin goodies in a super-light silicone base with zero oil. Top your serum of choice with a good oil-free moisturizer. CeraVe’s PM Moisturizing Lotion (or CVS’s awesome generic version, pictured above) and Neutrogena’s Hydro Boost Gel-Cream Extra-Dry Skin or Hydro Boost Water Gel (for normal/combination skins) are great oil-free moisturizer that absorb quickly while providing excellent hydration and skin-beneficial ingredients like hyaluronic acid. Allow lotion to absorb into skin at least five minutes. Then move on to Step #2.
img_6436
Step #2 – Using a plain tissue (do NOT use the kind with added lotion or emollients), oil-blotting paper or even TP (no shame), lightly blot away any excess moisture from your face. If you’re applying this foundation at night, you can go ahead and skip ahead to Step #3 now.

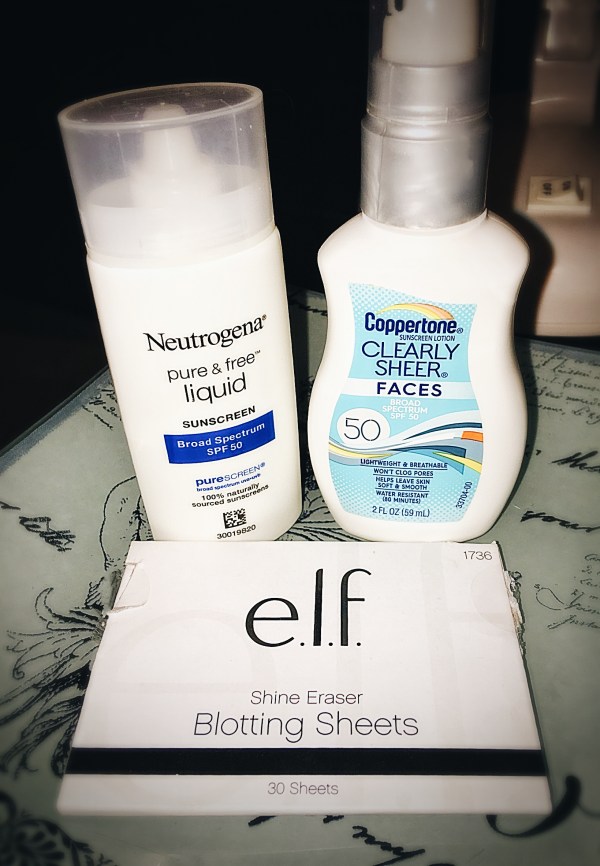
If you are getting ready to go out during the daytime, you now want to apply a lightweight easily absorbed sunscreen with broad spectrum sun protection of at least SPF30. I like Coppertone Clearly Sheer Faces Broad Spectrum SPF50 (which is an all-chemical sunscreen best for non-sensitive skin types) or Neutrogena pure & free Liquid Sunscreen Broad Spectrum SPF50 with purescreen® (all-mineral sunscreen best for sensitive skins. Read more about this product and other inexpensive broad-spectrum sunscreens here). Both these products have a thin, almost watery consistency that absorbs quickly. The Coppertone option is a chemical sunscreen so it absorbs more easily leaving no white or gray cast behind, but it’s also more likely to cause an allergic reaction in the most sensitive individuals. Allow sunscreen a few (3-4) minutes to absorb. Then proceed to Step #3.
img_6430
Step #3 – Blot your face again (oily skin types, do NOT skip this step). Then apply a silicone-based primer to your T-zone and any other areas where your foundation tends to apply unevenly or break up during the day. Allow primer to set at least 3-5 minutes. Then blot again (yes, again!) with a clean tissue or blotting paper.

A few of my favorite primers for this application include: L’Oréal Revitalift Miracle Blur Instant Skin Smoother Finishing Cream SPF30; Garnier Skin Renew 5 Second Blur Instant Smoother; Smashbox Photo Finish Foundation Primer (I have the Green Color-correcting one, but they’re all terrific); Napoleon Perdis Auto Pilot Radiance Boosting Primer (this is the best primer for dry or aging skin). Give your primed skin at least 3 minutes to allow primer and other products to fully absorb and skin to be completely dry before proceeding to actual foundation application (Step #4).
img_6423
Step #4 – Use a damp makeup sponge apply 1 pump Milani Conceal+Perfect foundation and 1 pump (3-4 drops) of your favorite oil-free BB Cream (my favorite is Dr. Jart’s Premium BB Cream SPF45+ though be careful with this because it contains a teeny amount of soybean oil) or an oil-free highlighter (dry skins or anyone looking for a more sheer more luminous finish). My favorite liquid highlighters for this step include: Revlon PhotoReady Skinlights (which is an excellent inexpensive liquid illuminator but has become increasingly difficult to find in stores though according to Revlon’s website indicates that this product has not been discontinued) and NYX Cosmetics Born to Glow Liquid Illuminator.  Stay away from Becca’s Shimmering Skin Enhancer in this case, though. Because even though it’s a terrific liquid highlighter and comes in some really flattering shades, it contains both avocado and mineral oils, so it will cause the foundation to break apart and look patchy.

Build this foundation in thin layers if you’re a makeup novice (like me) and not an expert makeup artist. It’s easier and ensures a prettier result. For the final layer, I like to mix equal parts Conceal+Perfect foundation and concealer (my current favs are Tarte’s Shape Tape and Maybelline’s Instant Age Rewind Eraser Dark Circle Treatment Concealer ) on the back of my hand and dab that mixture in a triangle shape under my eyes and cheek area using my finger. Then I’ll blend this mixture out using my damp beautyblender® sponge. Finally, I’ll use a small amount of foundation to touch up any other blemishes or discolorations needing additional concealing before moving onto finishing touches (Step #5).
img_6424
Step #5 – Once you are satisfied with the level of coverage you’ve achieved, blend out any creasing and set this product with your favorite setting powder. There are lots of good ones available in all price ranges so don’t get carried away by the hype. I definitely recommend setting this foundation with powder, even for drier skins but especially for those with combo to oily skins not only to avoid creasing but for best longevity and most flawless result. If you have the time, you can also bake the undereye or areas where large pores are an issue. And I like to finish with a few spritzes of setting spray. My current favorite setting spray is E.L.F.’s Makeup Mist and Set but any oil-free setting spray will work.
img_6422-1
Additional Notes on Application: Milani states this foundation may be applied, “…with fingertips or a brush beginning at the center of the face, blending outward.” I prefer applying this with a damp beautyblender® type sponge. I had some success using my finger as well, but I just really dislike apply foundation with fingers. For some reason I dislike the feeling of it on my fingers and hands. Has nothing to do with the texture of this particular product. Actually, if you enjoy using your fingers to apply foundation, this may be a good match for you because the warm of your fingers may help you spread this around. Because it’s thicker than your typical liquid foundation (MUF’s Ultra HD Invisible Cover Foundation for example), I found that applying it with a brush left streaks and wasn’t very pretty. I wouldn’t try brush application unless you’re lucky enough to own an Artis (oval 7) foundation brush. Finally, though Milani suggests applying “a dime-sized amount of product,” all at once, I’d caution against it. I suggest applying thinner layers until achieving desired level of coverage. Trying to apply too much all at once tends to make the product bunch up and look heavy.

Summary: Remember that this foundation is oil-free and composed primarily of water and silicones, so you want to take the time to prep your skin using water and silicone-based products and control any surface oil you may have on your skin. Avoid using any products that contain oil. Dry or combo skin types will want to use a water-based moisturizer and allow sufficient time for it to absorb. Then tissue off excess moisture before applying a light broad-spectrum sunscreen and silicone-based primer. Those with oily skin will want to take extra care to prime skin with an oil-controlling primer and tissue off excess oil between each step. Because this foundation is thick, it is best applied in thin layers with a damp makeup sponge. You can thin it out even more by adding a drop or 2 of highlighter or BB cream. You can also mix it with your favorite (oil-free) concealer to highlight and brighten. Be sure to set this product with your preferred setting powder and finish with your favorite setting spray (if desired).

#NoFilter Milani's Conceal+Perfect 2-in-1 Foundation+Concealer

#NoFilter Milani’s Conceal+Perfect 2-in-1 Foundation+Concealer

Ingredient List: Water, Cyclopentasiloxane, Isononyl Isononanoate (oil-free emollient), Cetyl Dimethicone, Butylene Glycol, Mica (shine), Glycerin (oil-free emollient), BIS-PEG/PPG Dimethicone, VP/Eicosene Copolymer, Bis-Vinyl Dimethicone, Ozokerite (wax), Polymethylsilsesquioxane, Disteardimonium Hectorite, Sodium Chloride, Phenoxyethanol, Beeswax (wax), Glycereth-18 Ethylhexanoate (oil-free emollient), Potassium Sorbate, Silica, Caprylyl Glycol, 1,2-Hexanediol, Xanthan Gum, Isododecane, Propylene Carbonate, Prunus Domestica Fruit Extract, Glycereth-18, Aluminum Dimyristate, Triethoxycaprylylsilane, Disodium Stearoyl Glutamate, Allantoin, C30-45 Alkyl Cetearyl Dimethicone Crosspolymer, Polyisobutene, C18-21 Alkane. +/- May Contain: Titanium Dioxide (CI 77891), Iron Oxides (CI 77491, CI 77492, CI 77499).

Read the full Daily Beauty Wisdom Review of Milani Conceal+Perfect 2-in-1 Foundation+Concealer here.

Wisdom for the Day:
All of us, then, reflect the glory of the Lord with uncovered faces; and that same glory, coming from the Lord, who is the Spirit, transforms us into his likeness in an ever greater degree of glory. ~II Corinthians 3:18 (Good News Translation)
Read more here.

Super Cheap+Super Easy DIY Makeup Brush+Sponge Cleaning Spray

Take Care of Your Brushes and They'll Last a Long Time!

Take Care of Your Brushes and They’ll Last a Long Time!


As I’ve written previously, I believe good quality makeup brushes are a wise beauty investment. And like any investment, you need to protect your investments by caring for your brushes and cleaning them regularly.

Clean Brushes All in a Row and Ready to Be Hung up to Dry

Clean Brushes All in a Row and Ready to Be Hung up to Dry

I have found that Sephora’s Solid Clean: Solid Brush Cleaner ($14 for 1 oz.) is excellent for deep cleaning brushes and ULTA’s Makeup Brush and Sponge Cleaner (spray; $10 for 5.1 fluid oz.) is less expensive; works well for quick cleanups; but doesn’t provide the same thorough results and has an odd smell to me.

So I set out to create a simple, inexpensive brush cleaner recipe. This recipe works very well, effectively removing the most tenacious waterproof gels and stains. I store this in a small (6oz. size) spray bottle. Then I make a second batch using slightly less water (described below) to keep in a non-spray bottle to clean my sponges.

Brushes in Need of Cleaning

Brushes in Need of Cleaning


Clean Brushes in a Jiffy!

Clean Brushes in a Jiffy!


I love using Kenra Professional Clarifying Shampoo to clean my makeup brushes! I find that it’s the best thing for remover tough, waterproof gels and creams. The best place to purchase Kenra products is probably ULTA because ULTA always almost offers $3.50 off $10 coupon is available electronically or in their catalogs. (Click here to sign up to automatically receive ULTA emails or here to enroll in ULTA’s text alert program). ULTA also periodically offers 20% off coupons and other deals for Platinum ULTA Members and ULTAMATE Rewards Credit Card holders. Learn more at ULTA.com or the ULTA store nearest you.
img_6298
If you already have a clarifying shampoo that you love or just want/need an even cheaper option, Johnson’s Baby Shampoo may be substituted for the Kenra Shampoo and works (almost) as well. And you can save some more money by signing up here to receive Johnson and Johnson brand coupons.

Ingredients:
• 2 Tbsp. Dawn Original or 1 Tbsp. Dawn Ultra Dishwashing Liquid
• 2 Tbsp. Kenra Professional Clarifying Shampoo or Johnson’s® Original Baby Shampoo
• 5 oz. (10 Tbsp.) filtered or distilled water

Hardware:
• Measuring spoons
• Small spray bottle (6-8 oz. size)
• Small funnel
img_6296
Instructions:
1. Carefully pour all 3 ingredients into a small spray bottle.
2. Tightly place lid on bottle and shake well to thoroughly combine ingredients.
3. Shake well before each use.
Makes about 5 oz. of cleanser.

NOTE: If you need a liquid brush and sponge cleaner or just don’t want to use a spray, you can easily adjust this recipe as follows – decrease the amount of water from 5oz. to 4oz. (8 Tbsp.) and keep all other measurements the same. Then, pour mixture into desired storage bottle.
Cleanser recipe can also be doubled to product 8-10oz. Use twice the above amounts of shampoo+dish liquid (to 4 Tbsp. of each) and double water to 10oz. (20 Tbsp.) for spray bottle or 8oz. (16 Tbsp.) for non-spray bottle.

Check this related post – $1 Makeup Brush Cleaning Tool – if you want to learn more about this genius and inexpensive little silicone cleaning tool you can pick up for just over $1 at your local Wal-Mart.

Wisdom for the Day:
“That is what some of you used to be! But you were washed clean, you were made holy to God, and you were made right with God in the name of the Lord Jesus Christ and in the Spirit of our God.” ~I Corinthians 6:11 (Common English Bible)
Read more here.
$1 Makeup Brush Cleaning Tool – Available at Walmart

Can a $1.25 Tool Clean My Messy Makeup Brushes?

Can a $1.25 Tool Clean My Messy Makeup Brushes? Yes!!!

I’ve tried to be honest about the fact that I’m not a makeup artist/expert. I’m a makeup fan/lover (there’s a big difference). My skill level may best be described as amateur, but I’m getting better, primarily because I’ve gradually acquired some nice makeup brushes. Quality makeup brushes are an investment. You really only need 5-10 high quality makeup brushes to take your makeup application technique to the next level.

Of course, you’ll need to properly care for those brushes in order to ensure they last a long time and give you the most bang for your beauty buck. And that means regularly cleaning them. That’s the step that tends to trip up busy moms (like me). We all know cleaning our brushes is important. Dirty brushes = patchy uneven colors; poor distribution of creams and liquids; breeding grounds for acne-causing bacteria; etc.

In recent years, an entire industry has grown around makeup brushes and cleaning led by innovators like the Chapman Sisters of Real Techniques fame along with Rea Ann Silva and the others at beautyblender®. So many companies today now offer cleaning supplies including brush cleaning solutions, wipes, mitts and even electronic brush cleaners like these (for a whopping $120+)!

Don’t worry. You don’t have to spend that much to quickly and effectively clean your brushes. One of my favorite YouTube Beauty vloggers – Emily Noel – raved about these silicone brush-cleaning eggs mitts she discovered at an “everything for $1” subscription shopping website in this video:

Emily is so adorable and enthusiastic. She almost always convinces me, but I’m trying to avoid signing up with any additional shopping sites. Too tempting. Still, those brush cleaners intrigued me, especially at just $1 + $3.95 shipping (roughly $3/each). So when I spotted these Lil’ Scrubbies facial brushes at Wal-Mart priced at just $2.43 (plus tax) for two, I grabbed them immediately hoping they’d work as well as Emily’s egg mitts. I tested my Scrubbies-as-makeup-brush-cleaners theory, and they worked great!
img_6209
To be clear, the Lil’ Scrubbies are designed to be used as facial exfoliators. But (as I’ve written before) I don’t need that because I’m really satisfied with my Foreo LUNA sonic cleanser. Both my Foreo LUNA and the Lil’ Scrubbies are made of quality silicone and have very similar scrubbing surfaces. So if you don’t currently have a daily facial cleansing tool you love, these little guys can meet that need as well (although Lil’ Scrubbies obviously will not provide the oscillating sonic technology of the Foreo LUNA).

Left: Foreo LUNA (Sensitive/Normal Skins) Right: Lil Scrubbies Silicone Facial Scrub Brush

Left: Foreo LUNA (Sensitive/Normal Skins)
Right: Lil Scrubbies Silicone Facial Scrub Brush

Lil’ Scrubbies’ have 2 different surface textures – tiny bristles and little round nubs which allow you to quickly clean different-sized and shaped brushes. The small nobs are especially effective at cleaning the sides of tapered brushes. The Scrubbies are made of a single piece of silicone with a suction cup feature built into the back. This suction cup piece makes it easier to securely hold the wet soapy Scrubbie securely between two fingers of your non-dominant hand while you scrub the brush with your dominant hand.
img_6199
You’re also able to keep the Scrubbie and the brush secure while cleaning and also have your thumb free in case you need to apply more pressure to spread out the tip of the brush to get it thoroughly clean (as Emily describes around 6:00 in the video).
img_6198
I found them exceptionally easy to use and effective in cleaning all types of brushes – from large fluffy powder brushes to flat-topped kabuki brushes to tapered shadow brushes and lash combs. Lil’ Scrubbies cleaned my brushes gently without ripping out the bristles or breaking the hairs. All this for a price of $1.215 each!
img_6208
Lil’ Scrubbies themselves are easy to clean with warm water and (if necessary a gentle soap). Then simply store on your mirror using the suction cup feature until ready for next use.

Clean Brushes All in a Row and Ready to Be Hung up to Dry

Clean Brushes All in a Row and Ready to Be Hung up to Dry

One last thing, toward the end of the video Emily talks about the brush drying “Sunflower tree” she uses for drying her brushes. Those trees retail for around $40 plus tax and shipping. Learn more here. But I use this recipe book rack I had sitting around (unused and in the way) in our kitchen. It works perfectly to hold for most (not all) of my brushes as they dry. It keeps them off the bathroom counter and holds them at a slightly downward angle, preventing water from collecting in the metal barrel of the brushes (which can damage the brushes and shorten their lifespans).

Multi-Tasking - A Repurposed Recipe Rack Holds Clean Makeup Brushes

Multi-Tasking – A Repurposed Recipe Rack Holds Clean Makeup Brushes

Wisdom for the Day:
Purify me from sin with hyssop, and I will be clean. Wash me, and I will be whiter than snow. ~Psalm 51:7 (God’s Word Translation)
Read more here.

Milani’s Conceal+Perfect 2-in-1 Foundation+Concealer – Product Review

Milani Conceal+Perfect 2-in-1 Foundation + Concealer

Milani Conceal+Perfect 2-in-1 Foundation + Concealer

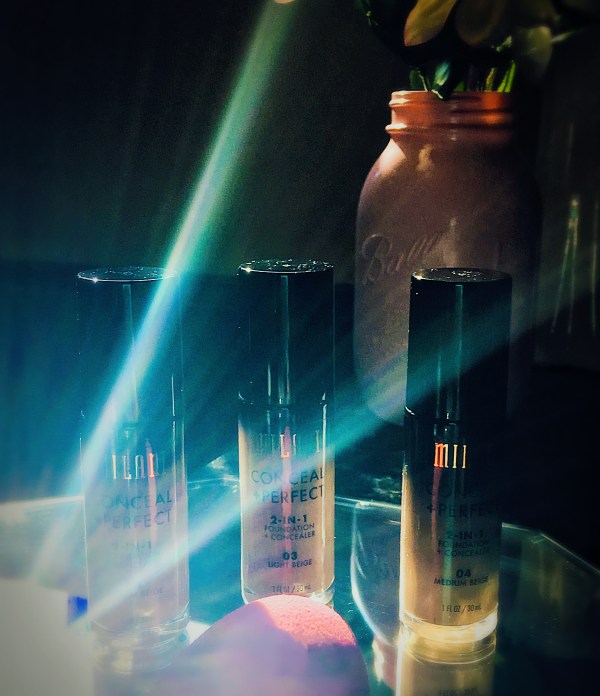
When YouTube Beauty experts began touting a new drugstore foundation that provided water-resistant full coverage for less than $10, I was super excited. I went to multiple drug stores across our area. I ultimately located a single bottle in a CVS store over an hour from our home (thank you online product locator!). I waited to try the product until I found another bottle in a second shade. Another family member heard about my searching and found a couple of stray bottles in her town so I ended up with 3 bottles of this tough-to-come-by product. But alas, after all that effort and all the hype, I was pretty disappointed because it just didn’t look very good on me. The coverage was there but it seemed to emphasize every tiny bit of texture on my face. Worst of all, it settled in the crows feet around my eyes. That’s an unpardonable foundation sin in my eyes (no pun intended). So I set all 3 bottles aside, writing the whole experience off as yet another makeup disappointment in along the way in the endless search for my holy grail foundation.
img_5936
A few days later I noticed those bottles and got to thinking about all the effort that went into obtaining them so I decided to play with it a little to see if I could make it work for me. I really wanted to like it because inexpensive foundations with this level of coverage do not come along every day. When I was younger, not that much younger, but before I got married and before I had our daughter playing with makeup was fun. Now it’s more of a chore because I don’t have a lot of time to do it, but I happened to have a few minutes on this day to play. So I took my time and prepped my skin with a good moisturizer and sunscreen. I allowed it sink in and then blotted my face before applying a primer which I allowed to set for a god 5 minutes. Then I used a damped beauty blender® and applied 2 pumps of this foundation along with another couple of products (explained in a separate post) and set it with a powder. You know what? It’s a really beautiful foundation! I discovered that even those of us with dry or mature skin can wear this foundation and have a lovely result. I have come to the conclusion that most people can’t just slap this foundation on and expect it to be pretty. It’s tricky for both dry and oily skins alike. But with proper prep it’s lovely; has a beautiful full-coverage finish and long wear-time. It may not be realistic for you to go through the prep to wear this everyday. But at this price point, Milani’s Conceal+Perfect 2-in-1 Foundation+Concealer deserves strong consideration for a spot in your beauty top drawer lineup.

MILANI Conceal+Perfect 2-in-1 Foundation+Concealer. Photo from Milani.com

MILANI Conceal+Perfect 2-in-1 Foundation+Concealer. Photo from Milani.com

Price: $9.99 for a 1 oz. pump

Color Range: Milani created 14 shades this foundation in 14 shades most of which are neutral, with varying levels of yellow or red undertones. It’s worth noting that several reviewers have complained that the lightest shade, 01 (Creamy Vanilla), is too dark and/or too yellow for very pale complexions. I can successfully wear shade 03 (Light Beige) or 04 (Medium Beige) and noticed that several of the shades are workable for light-medium skin tones. I’ve also noticed that most drugstores only carry a few shades; that none of the Walmarts in our area carried this foundation; and that none of the stores carried any of the darker shades which was really disappointing.

This product has a lot in common with Urban Decay’s recently launched “All Nighter” Foundation (similar texture, coverage and longevity promises). But while Milani offers fewer shade options, those shades don’t tend to darken, change colors on the dry-down or noticeably oxidize which are common complaints among reviewers at Makeup Alley of All Nighter.

Coverage: This is FULL coverage friends! Full. Coverage. Lots of foundations promise full coverage, but this one delivers. 2 Pumps was fully sufficient to cover my whole face with a damp sponge. I had enough left over to cover some sun spots on my chest and touch up some red areas around my nose that always need extra coverage.

Re Milani’s claim that this doubles as a concealer – yes and no. As I mentioned above, additional layers or spot application quickly and easily covered and sun spots or minor discoloration but it is not sufficient to cover the puffiness and dark circles under my eyes. For that, I need to mix the foundation with high-powered concealer.

Texture + Finish: The texture of this one could be described as a liquid/cream hybrid. The finish is more satin than matte with a hint of luminosity that is flattering at first, especially on dryer skin. However, it can emphasize any uneven texture or flaws on the skin and may not flatter oilier skin types.

Wear: Milani claims this foundation is waterproof and wears all day, and “works around the clock to keep skin looking naturally perfect.” This will wear at least 6 hours with a silicone-based primer. And because the finish is more satin than matte, I’d recommend setting it with powder, even for drier skins and especially for those with combo to oily skins. Oily skins will get the longest wear by using a mattifying primer underneath. Dry skins should be careful not to use an oil-based moisturizer or sunscreen product before applying this foundation. Because this is an oil-free foundation it won’t react well to oil-based products and that oil will in fact cause the foundation to break apart, shortening the its longevity.

Application: Milani recommends the following application, “Apply a dime-sized amount of product with fingertips or a brush beginning at the center of the face, blending outward.” I prefer applying this with a damp beautyblender® type sponge. I had some success using my finger as well, but I just really dislike apply foundation with fingers. For some reason I dislike the feeling of it on my fingers and hands. Has nothing to do with the texture of this particular product. Actually, if you enjoy using your fingers to apply foundation, this may be a good match for you because the warm of your fingers may help you spread this around. Because it’s thicker than your typical liquid foundation (MUF’s Ultra HD Foundation for example), I found that applying it with a brush left streaks and just wasn’t very pretty. I wouldn’t try it unless you’re lucky enough to own an Artis (oval 7) foundation brush. To avoid creasing, I’d recommend setting this with powder, even for drier skins but especially for those with combo to oily skins.

Skin Beneficial Ingredients: This foundation is composed primarily of water and a mix of multiple silicones (all the silicones highlighted below) as well as various oil-free emollients including glycerins and wax. This also contains a very small amount of a fruit-based (in this case plum) extract – Prunus Domestica Fruit Extract – shown to provide some antioxidant properties. But it’s way down the ingredient list and not a powerful or well-researched antioxidant so I would count on it to do very much for your skin.

Full Ingredient List: Water, Cyclopentasiloxane, Isononyl Isononanoate (oil-free emollient), Cetyl Dimethicone, Butylene Glycol, Mica (shine), Glycerin (oil-free emollient), BIS-PEG/PPG Dimethicone, VP/Eicosene Copolymer, Bis-Vinyl Dimethicone, Ozokerite (wax), Polymethylsilsesquioxane, Disteardimonium Hectorite, Sodium Chloride, Phenoxyethanol, Beeswax (wax), Glycereth-18 Ethylhexanoate (oil-free emollient), Potassium Sorbate, Silica, Caprylyl Glycol, 1,2-Hexanediol, Xanthan Gum, Isododecane, Propylene Carbonate, Prunus Domestica Fruit Extract, Glycereth-18, Aluminum Dimyristate, Triethoxycaprylylsilane, Disodium Stearoyl Glutamate, Allantoin, C30-45 Alkyl Cetearyl Dimethicone Crosspolymer, Polyisobutene, C18-21 Alkane. +/- May Contain: Titanium Dioxide (CI 77891), Iron Oxides (CI 77491, CI 77492, CI 77499).

Summary and Daily Beauty Wisdom Rating: There’s much to love about this product. But if you read the reviews, you’ll notice lots of people have trouble with it too. It’s definitely tricky. Oily skinned gals find it breaks up and gets shiny; while those with drier skin find it emphasizes rough patches and fine lines. When I first tried this foundation, I was really disappointed and was convinced it just didn’t work for me. It takes a couple of tries and sufficient prep to get it to work for you. If you have the time and patience, it can be a beautiful, cost-efficient foundation for days when you want to “go all out.” I’m loving this one now. After some trial and error, this has become my current fav. It’s even replaced Revlon’s ColorStay Whipped Creme Makeup as my go-to foundation for a flawless, full coverage look. Be on the look-out for a follow-up post sharing the tricks I discovered to make this work for me!

Additional Reviews:
Influenster Reviews (4.2 / 5 star rating)
Makeup Alley Reviews (3.2 / 5 lipsticks rating)
Allure Magazine Reviews (ranked as Allure Best of Beauty for 2016 and Allure Best Beauty Steals for 2016)

Find full product detail and info at Milani’s product page here.

Wisdom for the Day:
“If someone listens to God’s word but doesn’t do what it says, he is like a person who looks at his face in a mirror, studies his features, goes away, and immediately forgets what he looks like.” ~James 1:23-24 (God’s Word Translation)
Read more here.
img_5937

E.L.F. $1 Essentials Eyebrow Stencils – Product Review

I’ve struggled with my eyebrows for decades, DECADES! My God-given brows are very dark brown and full. In my early 20s I went blond and decided those dark brown brows were way too harsh. But instead of doing the wise thing (i.e. tinting them a lighter shade), I plucked them until they were nearly invisible. Hey, thin brows were the thing in the late 1990s / early 2000s. Still, when I look back at pics of myself from those years, I shudder. My whole face looks weird.

On the left, 11 years old with natural (untouched) hair and brows; At right, 20 years old with big blond hair and barely-there brows.

On the left, 11 years old with natural (untouched) hair and brows; At right, 20 years old with big blond hair and barely-there brows.

When I finally put down the tweezers, my brows did grow back, albeit less full and with a few holes. But I found myself completely unsure about how to style them. I spent hours browsing (pun intended) IG pics and video tutorials for #Instagrambrows, #browsonfleek, #browsheldhigh, and so on. I bought tons of brow products – gels, powders, pencils, combs, spoolies, brushes, etc. Finally I decided I needed some sort of guide. I found this video from Angie of Hot & Flashy.com.
In this video Angie demos and highly recommends an all-in-brow kit from Too Faced. The kit retails for $39 and contains 3 stencils, 2 “universal” brow powders, a wax, one pair of tweezers, a mini slanted brush and a mini spoolie brush.

So, I started thinking, I already have most of those products. What I need is stencils! After searching for several weeks I found these at one of the Wal-marts in our area, but I’d probably checked 3 or 4 before finding them. E.L.F.’s Essential Eyebrow Stencils are one of the best, most cost-efficient beauty purchases I’ve made in years. They’re incredibly easy to use; easy to clean; and (as I’ll explain) offer options for just about everyone. Since I began using these stencils a couple weeks ago, I received multiple compliments on my brows. The first compliments my brows have received since…well, since I went blond.

Brows again at last!

Brows again at last!

Price: $1

What You Get: 4 Flexible brow stencils in different sizes/shapes in order to accommodate different natural brow shapes or different styles you may want to try. The shapes included are fairly standard (though many kits only offer 3, not 4 stencils) and are as follows:
• Soft Arch – the most natural option
• Structured Arch – the highest arch with a sharp tail
• Curved Arch – a nicely curved arch and gently tapered tail
• Full Arch – the shape I chose, the most voluptuous shape with a fuller arch and tail

Special Features: A few aspects of this bargain-priced kit are special – The individual stencils are divided by a white piece of paper which has a cutout of the brow shape on the stencil behind it. That helps brow novices know for sure which stencil they’re looking at – i.e., “is this a structured or the full arch?” You can also hold the papers up to your own brows to try out the looks before committing to one of the stencils. When you select one of the stencils, you’ll find that the brow shapes are stamped onto the square silicone stencils but the brow shapes are not “punched” out. That means, if holding paper up to your brows didn’t help you select a stencil, you can pop out the individual shapes brow shapes and place each one over your own brows to determine which one/ones suit you best. You can also use those pop-out shapes to guide you in removing errant hairs outside your preferred shapes, especially helpful if you’re like me and tend to be tweezer-happy.

Lastly, these stencils are very flexible. They mold to the shape of your face and stretch slightly (but not overly so) to accommodate longer brows. That may seem like a small thing but some brow stencils are hard and inflexible which is strange because faces are not flat and because brows vary in length. The thin material of E.L.F.’s stencils warms to your skin’s temperature, allowing it to better adheres to your eye area, and making it much easier to hold the stencil in place with one hand. And that allows you an easier, quicker and more precise brow application every time!

Where to Buy: I found it at Wal-mart on the E.L.F. display. The selections vary store to store so you may have to check different Wal-marts if you can. Some drugstores, like CVS, also carry limited selections from the E.L.F. product lines. The only guaranteed way to purchase this or any E.L.F. product is from E.L.F.’s website. Shipping costs vary by location (E.L.F. offers free shipping to all USA sites for all orders of $25 and up).
See full product info here.

E.L.F. Essentials Eyebrow Stencils (photo from E.L.F website)

E.L.F. Essentials Eyebrow Stencils (photo from E.L.F website)

Summary: If you are brow-challenged or are a makeup beginner, this E.L.F. Essentials Eyebrow Stencil Kit is definitely worth the small investment!

Wisdom for the Day:
“My bride, my sister, you have charmed me. You have charmed me with a single glance from your eyes, with a single strand of your necklace.” ~Song of Solomon 4:9 (God’s Word Translation)
Read more here.

Hi I'm Karen.

I appreciate you stopping by Daily Beauty Wisdom.

I hope while you're here you find some tips, tricks and recipes to help you feel healthier and prettier, save some money, and live a life filled with wisdom and beauty.

Before you leave, don't forget to enter your email in the subscription box below. You'll automatically receive all new DBW posts and content sent directly to your mailbox of choice.

So be sure to subscribe and never miss another dose of Daily Beauty Wisdom!

us-2

Subscribe!